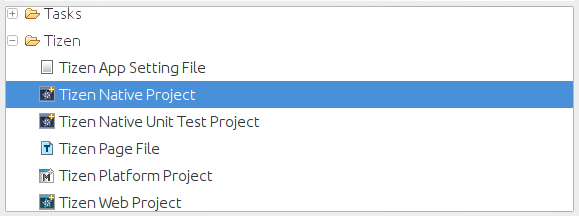
Figure 1: The 'New Project' dialog.
A lot of discussion about app development on Tizen has so far been focused largely on the web SDK, which allows for the creation of Tizen apps using HTML5 and Javascript. However, with the release of the 2.0 SDK another option is now available in the form of the native SDK, which makes it possible to also write Tizen apps in C++. This tutorial will discuss when it might be more suitable to make use of the native SDK and will provide a guided example of how to employ many of the benefits provided by native development.
I'll be basing this tutorial around the creation of a simple native application which has the ability to identify music heard nearby. This will involve reading raw audio data from the device's microphone, making use of a third party library to generate an audio fingerprint, and then performing a HTTP request using that fingerprint to identify any music that is currently being played.
I'll be assuming a modest familiarity with the Tizen IDE and emulator, but little or no experience with the native SDK. For a brief introduction to the various Tizen development tools and the web SDK, I suggest reading The Definitive Guide to Developing Portable Tizen Apps.
While the Tizen team have been doing a great job exposing a lot of Tizen devices' functionality through the web SDK, there are still some tasks which it makes sense to perform natively. For example, while the forthcoming Web Audio API (as yet still only a working draft) makes the processing of raw audio data possible in Javascript, this is the sort of task that is perhaps better suited to being performed natively.
Prior to the development of Tizen, Samsung had their own mobile operating system called Bada, which is gradually being deprecated in favour of Tizen. However, existing Bada developers will be happy to hear that the Tizen native SDK is based heavily on the Bada SDK, so if you already have native apps targeting Bada it should be relatively painless to port them to Tizen.
Personally I find one of the most compelling reasons to consider using the native SDK instead of the web SDK is the ability to make use of the wealth of existing Linux libraries. This allows you to incorporate very advanced and unique features into your apps with minimal effort on your part. For example, if you were interested in incorporating vision processing techniques into your application there's the very popular OpenCV library; wanting to make use of machine learning? Try the Fast Artificial Neural Net library. By writing native Tizen apps you gain access to decades worth of past development and research on general Linux platforms.
In the following example we'll be using the Echoprint library to generate audio fingerprints from snippets of a song recorded through the phone's microphone. These fingerprints allow us to then query web services to find out what the song is and who performed it. Rewriting the Echoprint library in Javascript would be a big undertaking and performance is likely to be somewhat hampered, but by writing a native C++ app we can use the already stable and well tested library provided by the Echoprint team themselves.
Creating a new Tizen native project is a simple process that should be familiar to anyone who has worked on any Tizen web projects in the past. To begin simply select File -> New -> Project..., the 'New Project' dialog should then appear (shown in figure 1), select 'Tizen Native Project' from the 'Tizen' category.
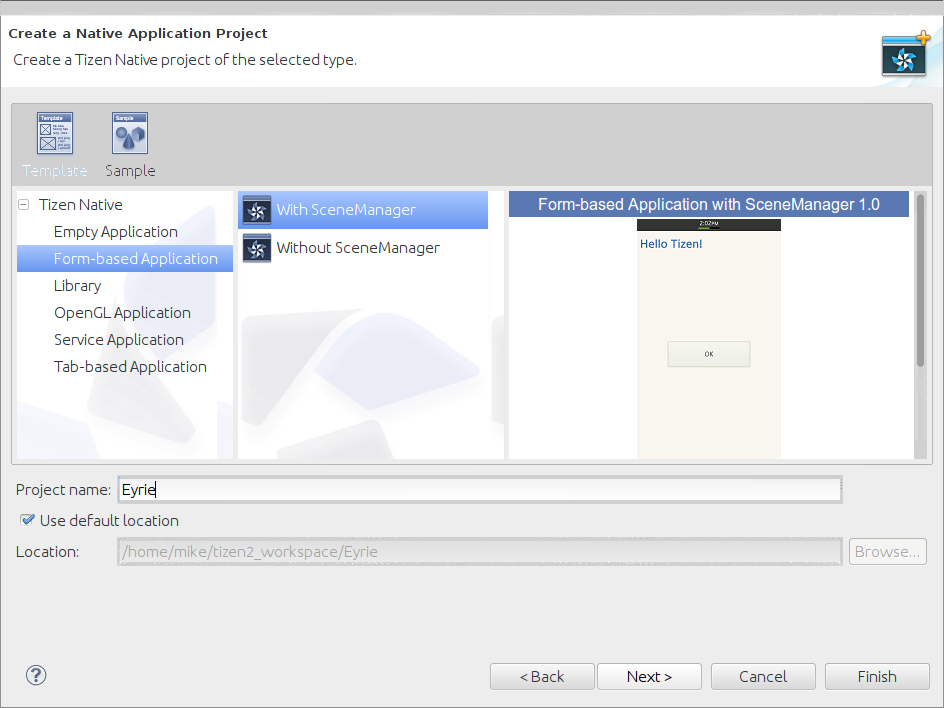
The project creation wizard (shown in figure 2) provides a number of templates for different types of native projects. For this example we'll make use of the Form-based Application template, however I recommend also exploring the Sample tab, as this provides examples for the basic usage of most general aspects of the native SDK. I've decided to call this project 'Eyrie', as it's effectively a basic port of the Eyrie music identifier, as such all the auto-generated files will be prefixed with this name.
Once you've completed filling out the project creation wizard it'll create some boiler plate code for a basic form application. We'll be focusing on three files in particular, 'eyrieMainForm.h', 'eyrieMainForm.cpp' and 'IDF_FORM.xml'. If you start the emulator and run the application now you'll be presented with a simple application with a single button, clicking that button will result in a message being posted to the Tizen device log.
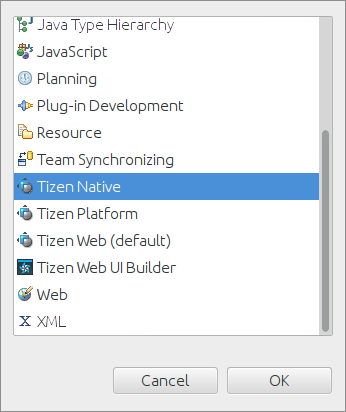
To view the output of the device log you first need to ensure that your workspace is in the 'Tizen Native' perspective, which can be opened by selecting Window -> Open Perspective -> Other... and then choosing 'Tizen Native' from the presented options (shown in figure 3).
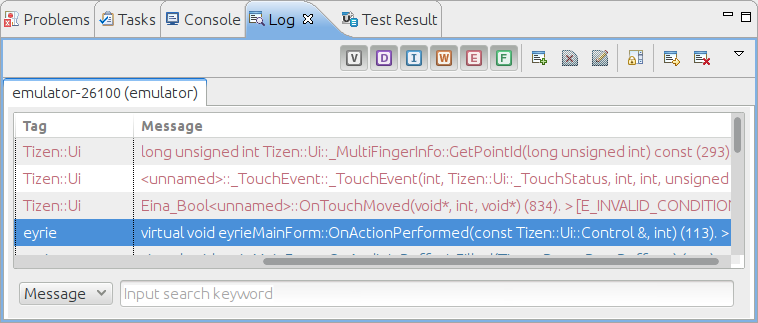
Once in the native perspective the log viewer can be found under the log tab at the bottom of the IDE (shown in figure 4). The log viewer can be very helpful for native development, you can add your own messages to it via the AppLog method and any uncaught errors will be displayed here. Alternatively you can also access the device log through the command line sdb tool found in the tools directory of your Tizen SDK installation, the device log can then be accessed by running ./sdb dlog.
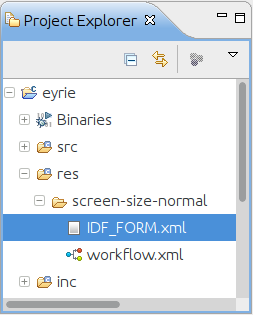
Much like the web SDK the native SDK includes a user interface designer. A simple interface has been created for us as part of the form application template we selected when creating our project. This interface can be found in the res/screen-size-normal/ folder of our project and is called IDF_FORM.xml (shown in figure 5).
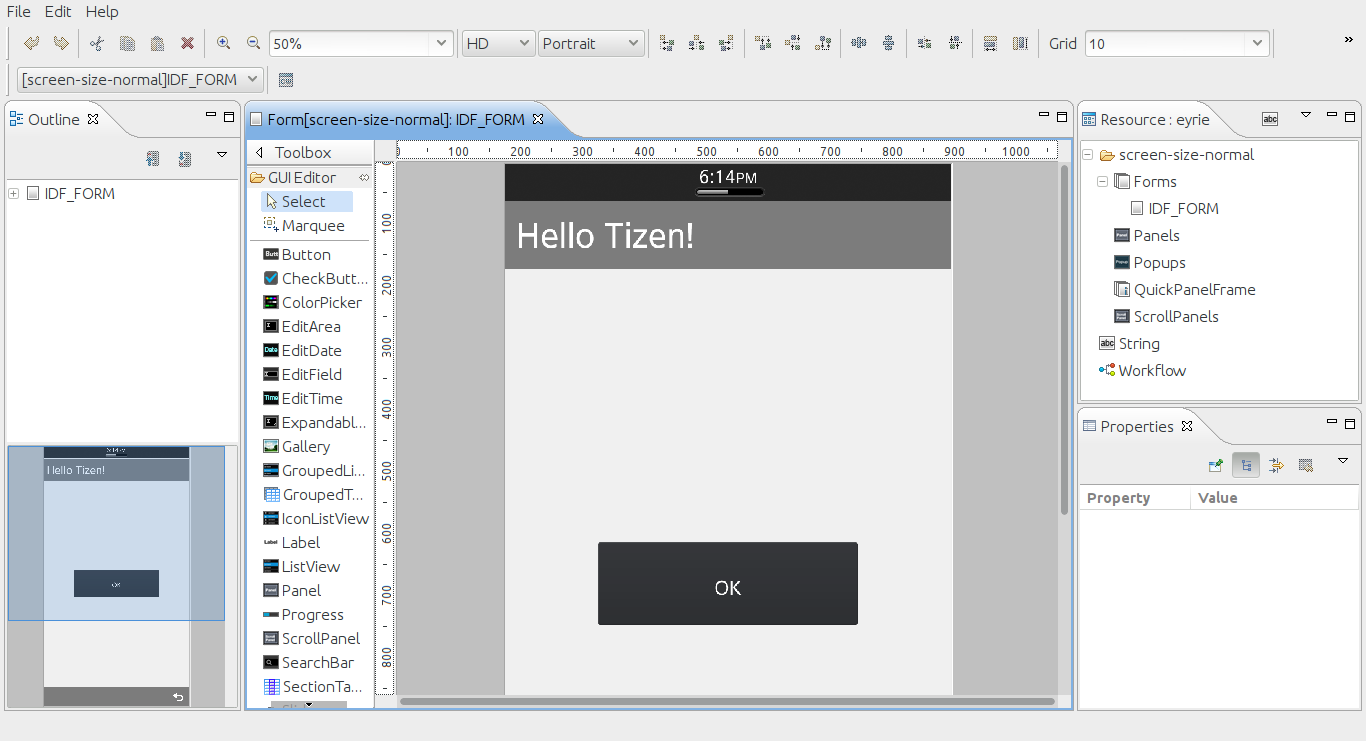
Double clicking on the file will launch the user interface designer (shown in figure 6). This should look pretty familiar to anyone who's used a modern interface designer and is simple enough to get to grips with. The basic form template is enough for our needs, the only changes I made were to change the button text to 'Record' (we'll be using this button later to begin recording from the microphone) and the title text to 'Eryie'.
Now we can start actually implementing the main functionality of our application. To start with we need to include the header for the media framework (FMedia.h) and make our class implement the IAudioInEventListener interface.
eyrieMainForm.h... #include <FMedia.h> #define MAX_BUFFER_COUNT 3 class eyrieMainForm : public Tizen::Ui::Controls::Form , public Tizen::Ui::IActionEventListener , public Tizen::Ui::Controls::IFormBackEventListener , public Tizen::Ui::Scenes::ISceneEventListener , public Tizen::Media::IAudioInEventListener ...
For the sake of brevity we will just provide stubs for all of the methods in the IAudioInEventListener interface, except for OnAudioInBufferIsFilled in which we'll do our main audio processing. In addition to this we declare our audio input and audio buffer variables.
eyrieMainForm.h
...
	virtual void OnAudioInBufferIsFilled( Tizen::Base::ByteBuffer* pData);
	virtual void OnAudioInInterrupted(void) {}
	virtual void OnAudioInReleased(void) {}
	virtual void OnAudioInErrorOccurred(result r) {}
	virtual void OnAudioInAudioFocusChanged(void) {}


protected:
	static const int ID_BUTTON_OK = 101;
	Tizen::Media::AudioIn audioIn;
	Tizen::Base::ByteBuffer audioBuffer[MAX_BUFFER_COUNT];
...
Before we can start receiving PCM data from the microphone we have to decide what format is most appropriate for our needs. In this case the decision is largely made for us, the Echoprint library requires data to be a mono stream with a sample rate of 11,025Hz stored in 32 bit floats. Unfortunately the Tizen audio library doesn't support float samples, so for now we'll simply request samples as unsigned 8 bit integers and then convert them ourselves later on.
eyrieMainForm.cpp
...
result eyrieMainForm::OnInitializing(void)
{
	result r = E_SUCCESS;

	AudioInputDevice inputDevice = AUDIO_INPUT_DEVICE_MIC;
	AudioSampleType sampleType = AUDIO_TYPE_PCM_U8;
	AudioChannelType channelType = AUDIO_CHANNEL_TYPE_MONO;
	int sampleRate = 11025;

	audioIn.Construct(*this);
	audioIn.Prepare(inputDevice, sampleType, channelType, sampleRate);

	for (int i = 0; i < MAX_BUFFER_COUNT; i++)
	{
		// Prepare buffers to store 10 seconds of PCM data
		audioBuffer[i].Construct(sampleRate * 10);
		audioIn.AddBuffer(&audioBuffer[i]);
	}

	// Setup back event listener
...
Finally we can make use of the button that was automatically created for us in the user interface to actually start the audio input device recording data.
eyrieMainForm.cpp
...
eyrieMainForm::OnActionPerformed(const Tizen::Ui::Control& source, int actionId)
{
	SceneManager* pSceneManager = SceneManager::GetInstance();
	AppAssert(pSceneManager);

	switch(actionId)
	{
	case ID_BUTTON_OK:
		AppLog("Record button is clicked!");
		audioIn.Start();
		break;

	default:
		break;
	}
}
...
I won't go in to great detail on the cross compiling of existing libraries here, as that could form a whole tutorial in and of itself. As a brief summary however, there are a couple of approaches that can be taken; you could either make use of the tool chain provided as part of the Tizen 2.0 SDK for standard cross compilation, or alternatively a slightly easier approach is to use the scratchbox provided as part of the Tizen 1.0 SDK (which I discuss in more detail in my previous tutorial, Writing native Tizen applications using the 1.0 (Larkspur) SDK Scratchbox and EFL), however this approach is not likely to be well supported in the future.
The libraries which I have cross compiled for this tutorial can either be downloaded here: example-libs.tar.gz, or found in the complete source code package listed at the end of this tutorial. These are compiled to work with the emulator, they would require recompilation for actual arm devices.
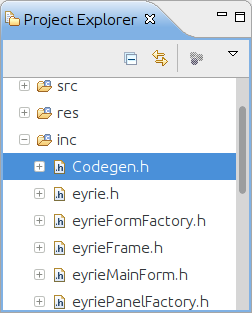
Once you've got your compiled library files, integrating them with the IDE's packaging system is relatively painless. First we'll need to import the library's header file(s) into the inc/ folder as shown in figure 7.
Then the compiled library files are placed in the libs/ folder (shown in figure 8), in this case we're also including zlib along with the codegen library as codegen is dependant upon it. This will be automatically included in your application's packages and used by your application without the need for further work on your part.

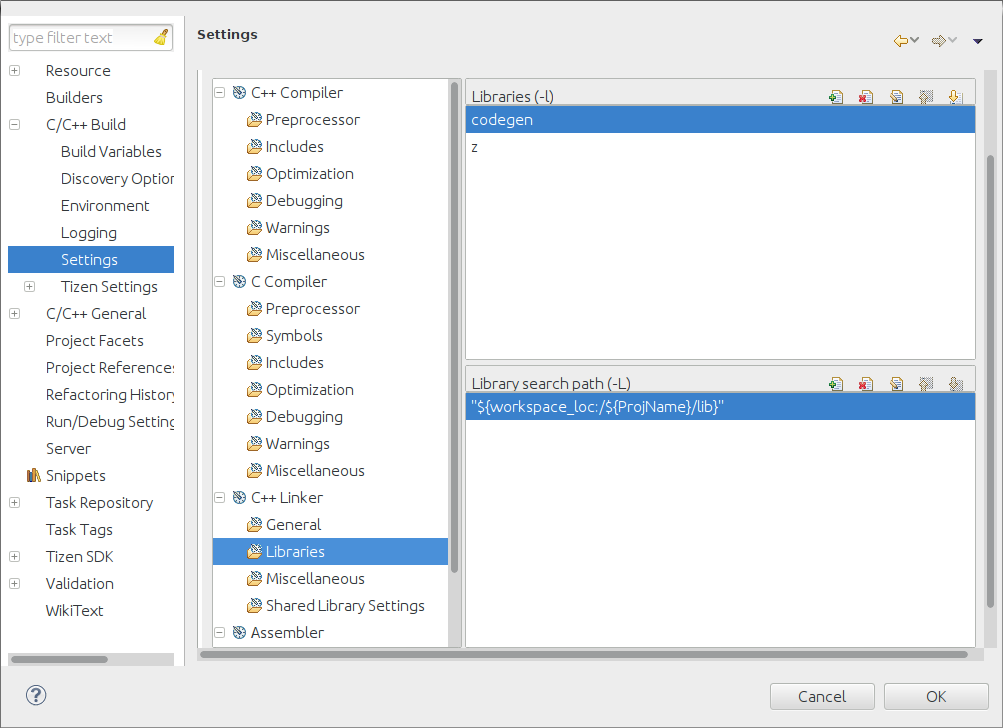
Finally we need to tell the linker about our custom libraries. This can be done by opening the project's properties and navigating to C/C++ Build -> Settings -> C++ Linker -> Libraries (shown in figure 9), then clicking on the 'Add...' button in the top right corner. We then provide the names of our libraries as if we were passing the -l option to a compiler ourselves, so libcodegen.so becomes simply codegen and libz.so becomes just z.
With our new library added to the project we can start making use of it in our code, first we'll simply include its header file.
eyrieMainForm.cpp#include <FApp.h> #include "eyrieMainForm.h" #include "Codegen.h" ...
Now we can really start using the library to generate fingerprints from our audio data. When our audio buffer gets full the OnAudioInBufferIsFilled method is called. I mentioned earlier that the Tizen audio API doesn't allow us to request audio samples in a floating point format, so first we'll need to convert the unsigned byte samples in to floating point values between -1.0 and 1.0. Once we have our samples in floating point format we can create a Codegen object (provided by the codegen library we imported earlier), and have it generate an audio fingerprint for us, which we then print out to the device log.
eyrieMainForm.cpp
...
void eyrieMainForm::OnAudioInBufferIsFilled(Tizen::Base::ByteBuffer* pData)
{
	AppLog("Buffer filled");
	float *rawbuf = (float *) malloc(pData->GetRemaining() * sizeof(float));
	for(int i = 0; i < pData->GetRemaining(); i++) {
		byte val;
		pData->GetByte(val);
		// Convert U8 to float
		rawbuf[i] = (val - 128) / 128.0f;
	}
	// Perform fingerprinting
	Codegen *codegen = new Codegen(rawbuf, bufSize, 0);
	AppLog("Code: %s", codegen->getCodeString().c_str());

	// Clear the buffer and reuse it
	pData->Clear();
	audioIn.AddBuffer(pData);
}
...
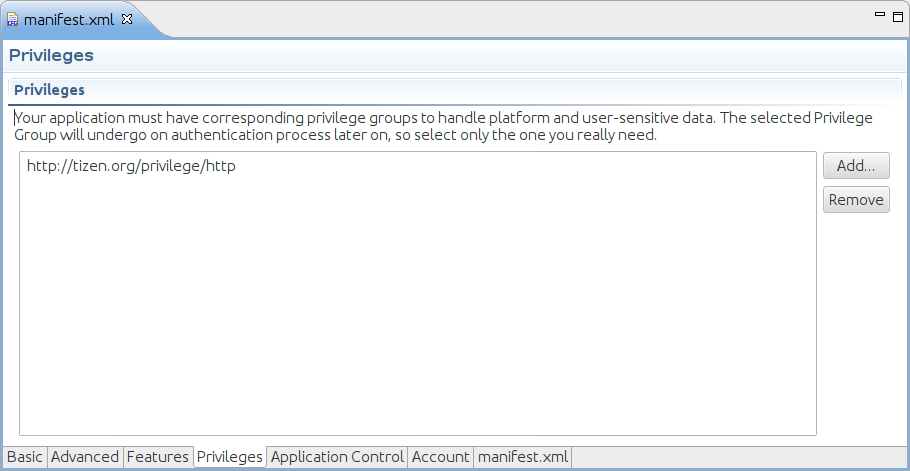
Now that we have a fingerprint generated by the codegen library we can use it to make a request from the Echonest service to find out what piece of music we're currently hearing. Before we can make HTTP requests we need to modify the privileges that our application requests, we can do this by opening the 'manifest.xml' file in our project and selecting the 'Privileges' tab at the bottom of the main viewing area (shown in figure 10). We then need to add the 'http://tizen.org/privilege/http' privilege to the project. If we didn't do this then any HTTP requests we attempted to make would be blocked by Tizen's security layer.
Once our application has permission to access the internet we can include the Tizen networking API and make our main form class implement the IAudioInEventListener interface.
eyrieMainForm.h... #include <FBase.h> #include <FUi.h> #include <FMedia.h> #include <FNet.h> using namespace Tizen::Net::Http; #define MAX_BUFFER_COUNT 3 class eyrieMainForm : public Tizen::Ui::Controls::Form , public Tizen::Ui::IActionEventListener , public Tizen::Ui::Controls::IFormBackEventListener , public Tizen::Ui::Scenes::ISceneEventListener , public Tizen::Media::IAudioInEventListener , public Tizen::Net::Http::IHttpTransactionEventListener ...
As before we'll keep the majority of the methods as stubs, the only exception being the OnTransactionCompleted method. We'll also declare a HttpSession variable which we'll use for the creation of our HTTP requests.
eyrieMainForm.h
...
	virtual void OnAudioInAudioFocusChanged(void) {}
	virtual void OnTransactionCertVerificationRequiredN(HttpSession& httpSession, HttpTransaction& httpTransaction, Tizen::Base::String* pCert) {}
	virtual void OnTransactionReadyToWrite(HttpSession& httpSession, HttpTransaction& httpTransaction, int recommendedChunkSize) {}
	virtual void OnTransactionReadyToRead(HttpSession& httpSession, HttpTransaction& httpTransaction, int availableBodyLen) {}
	virtual void OnTransactionAborted(HttpSession& httpSession, HttpTransaction& httpTransaction, result r) {}
	virtual void OnTransactionCompleted(HttpSession& httpSession, HttpTransaction& httpTransaction);
	virtual void OnTransactionHeaderCompleted(HttpSession& httpSession, HttpTransaction& httpTransaction, int headerLen, bool bAuthRequired) {}

protected:
	static const int ID_BUTTON_OK = 101;
	Tizen::Media::AudioIn audioIn;
	Tizen::Base::ByteBuffer audioBuffer[MAX_BUFFER_COUNT];
	HttpSession *httpSession;
...
When our main form class is initialised we can then also initialise our HttpSession.
eyrieMainForm.cpp
...
result eyrieMainForm::OnInitializing(void)
{
	result r = E_SUCCESS;

	httpSession = new HttpSession();
...
Now when the audio buffer is full and we generate our fingerprint we can set up a HttpRequest to query the Echonest API using the generated fingerprint code.
eyrieMainForm.cpp
...
void eyrieMainForm::OnAudioInBufferIsFilled(Tizen::Base::ByteBuffer* pData)
{
	AppLog("Buffer filled");
	float *rawbuf = (float *) malloc(pData->GetRemaining() * sizeof(float));
	for(int i = 0; i < pData->GetRemaining(); i++) {
		byte val;
		pData->GetByte(val);
		// Convert U8 to float
		rawbuf[i] = (val - 128) / 128.0f;
	}
	Codegen *codegen = new Codegen(rawbuf, bufSize, 0);
	AppLog("Code: %s", codegen->getCodeString().c_str());

	httpSession->Construct(NET_HTTP_SESSION_MODE_NORMAL, null, L"http://developer.echonest.com/", null);
	HttpTransaction *httpTransaction = httpSession->OpenTransactionN();
	// Make our current class receive HTTP events
	httpTransaction->AddHttpTransactionListener(*this);
	HttpRequest* httpRequest = httpTransaction->GetRequest();
	NetHttpMethod method = NET_HTTP_METHOD_POST;
	httpRequest->SetMethod(method);
	httpRequest->SetUri("http://developer.echonest.com/api/v4/song/identify");
	// Setup the data we're sending to the Echonest
	String querystr("api_key=INSERTYOURKEYHERE&query=[{\"metadata\":{\"version\":4.12},\"code\":\"");
	querystr.Append(codegen->getCodeString().c_str());
	querystr.Append("\"}]");
	ByteBuffer *queryBuf = StringUtil::StringToUtf8N(querystr);
	ByteBuffer body;
	body.Construct(strlen((const char *) queryBuf->GetPointer()));
	body.SetArray((byte *) queryBuf->GetPointer(), 0, strlen((const char *) queryBuf->GetPointer()));
	body.Flip();
	httpRequest->WriteBody(body);
	HttpHeader *pHeader = httpRequest->GetHeader();
	pHeader->AddField(L"Content-Type", L"application/x-www-form-urlencoded;charset=UTF-8");
	httpTransaction->Submit();
...
(To make use of this aspect of the application yourself you'll need an API key from the Echonest, simply replace the string 'INSERTYOURKEYHERE' with your own api key.)
When we get a response to our HTTP request and the device has finished downloading the entire message our OnTransactionCompleted method will be executed (part of the IHttpTransactionEventListener interface). Below we simply print the result of our query to the device log and then close the HttpTransaction. The Tizen native SDK imposes a strict limit on the number of HTTP transactions that can be open concurrently, so it's important to close our transaction once we're done with it.
eyrieMainForm.cpp
...
void eyrieMainForm::OnTransactionCompleted(HttpSession& httpSession, HttpTransaction& httpTransaction) {
	AppLog("Transaction completed");
	HttpResponse* httpResponse = httpTransaction.GetResponse();
	ByteBuffer* buffer = httpResponse->ReadBodyN();
	AppLog("Response: %s", (const char*) buffer->GetPointer());

	httpSession.CloseTransaction(httpTransaction);
}
...
We've now created an application which can record data from a microphone and then perform some simple audio processing on it to convert its sample format, a third party library is then used to generate an acoustic fingerprint before we finally query a HTTP service and display the output via the device log. In the process we've seen how to create a basic native application, we've taken a brief look at the native user interface builder, we've made use of both the native audio input and HTTP APIs, we've discussed how to set permissions to allow for HTTP communication and we've seen how to include third party libraries in our projects.
All the source code for the application developed as part of this tutorial can be found here: tizen-native-dev-example.tar.gz.