Inside the recording view, only the instruments are displayed. This is where you will spend most of your time recording, editing and re-recording.
Recording is the first step in the process of creating a project. You will add instruments, usually one at a time, record audio into that instrument, then add the next instrument. Working in the recording view usually follows the steps listed here.
Instruments are a key concept in Jokosher. Think in terms of instruments, instead of tracks. Instruments allow you to infer a lot about your project at a glance.
Currently, instruments are very simple - they just contain the name and icon of the instrument.
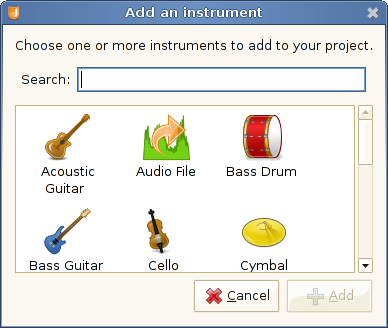
To add an instrument, click on the button to bring up the dialog, then pick the instrument that best resembles what you'll be recording. Click to finish.
Notice that once an instrument is added, you can click on its name and change it to anything you want.
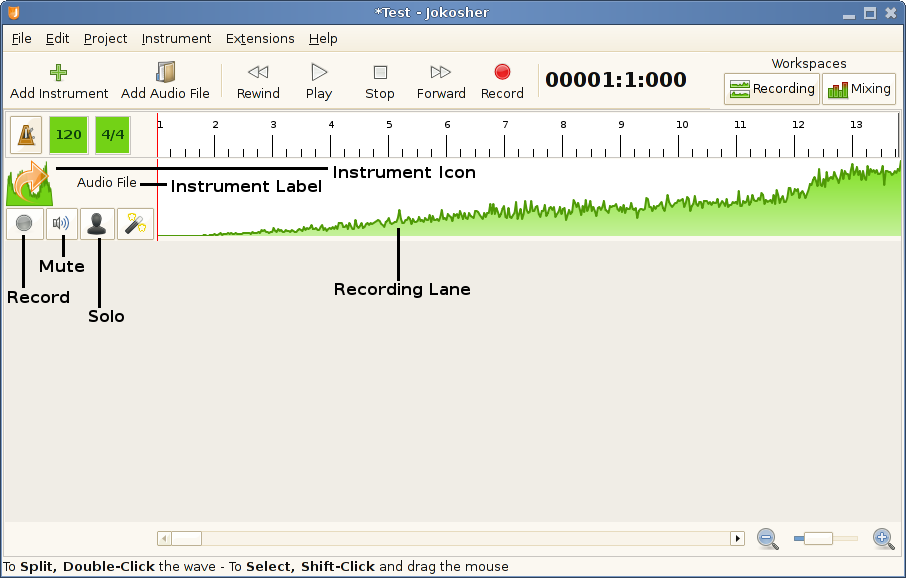
Add Instruments — After adding an instrument, you will see that it has the following features:
Instrument Icon — the selected icon for the instrument.
Instrument Label — this can be changed at will simpy by clicking on it. It is just a label to identify the instruments in case you have several with the same icon.
— this button will be clicked to “arm” the instrument prior to recording.
— his button will silence the instrument during playback.
— the opposite of the button. When pressed, you will hear this instrument as “solo” during playback, with all other instruments muted.
Recording Lane — to the right of the buttons is an area where recorded audio will be displayed for this instrument.
Set Connections — as explained in the section called “Project”, the different sound card inputs can be routed to different instruments at will. In this way, even if there is only one input, by connecting it to each instrument -one at a time-, multiple instruments can be sequencially recorded.
Record — at this point you are ready to record this instrument. If it's a live instrument, plug it in, press the button on the instrument to arm it, then hit the button on the main Toolbar. When done recording, click .
To import an existing audio file, right-click on the instrument Recording Lane then click . Select the file you'd like to import, then click . Notice that the audio is now in the recording lane for that instrument. The waveform shows you the volume level at any point in the recording.
Alternatively, you can use the button in the main toolbar, or drag and drop the audio file.
Repeat — unarm this instrument and begin the process again by adding the next instrument until all desired instruments are recorded.
Once all instruments are recorded, editing begins. Think of the instruments as raw materials that you will shape into a final project. Jokosher offers several tools to help with editing:
Move — this function shifts a piece of audio in time. To Move a piece of audio, click it and drag it left or right until it is in the desired position. When recording Instruments separately, this function can be used to get Instruments in sync with each other.
In order to edit audio, a recording often needs to be divided into pieces. Jokosher offers two main tools to do this:
Split — this function divides the audio in an instrument into two sections. Use Split when you want to keep the entire recording, but need to separate it into pieces. To split, double-click in the instrument lane at the point where the audio should be divided.
Trim — this function deletes the non-selected portion of the instrument audio. To , hold down the Shift key, click with the mouse at the beginning of the section you'd like to , drag the mouse to the right to the end of the desired section, and release both the Shift key and the mouse button. A tab will appear below the selected section. Click this tab to the non-selected portion of audio.
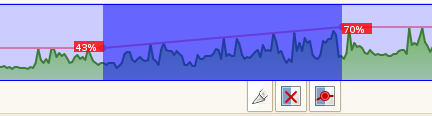
Volume fades — volume levels can be edited for sections of audio. Select a section of an instrument by pressing Shift, then clicking and dragging. You see a selection as in the figure below. Notice the red fade points, which will initially be labeled “100%”. Grab the corresponding fade point and drag it up or down to adjust volume at that point.
Cut and Paste — this process moves sections of audio from one place to another. If you don't want to Cut a complete recording, Split it into pieces or as above, to separate the piece you'd like to work with. Next, click on the piece you'd like to Cut and select → (Ctrl+X) . Finally, click → (Ctrl+V) in the spot where the section should go.
Copy and Paste — this process is used to make copies of the same audio in more than one place. It is similar to Cut and Paste above. First select a piece of audio and click → (Ctrl+C) . Then click in the spot where this piece should go and select → (Ctrl+V) to complete the operation.
Delete — this removes a piece of audio completely from the current project. Select the section you want to delete and then click → or hit the Delete key on the keyboard.
Undo — in case you accidentally deleted a piece of audio or pasted it into the wrong spot, select → (Ctrl+Z) to revert the last change you performed. To undo more steps, repeat this process.
Redo — if you wish to bring back a change you reverted with the Undo function, you can use Redo. Click → (Ctrl+R) and the last change you reverted with Undo will be restored.